Guest Posts
October 17, 2024
min read

[Guest Post] How to Automatically Issue Badges for Instruqt Labs

Raphaël Pinson
Senior Technical Marketing Engineer

Editor’s Note: We’re excited to welcome back Raphaël Pinson, Senior Technical Marketing Engineer at Isovalent (the creators of Cilium) as a guest author for this Instruqt blog post. Raphaël and his team recently launched instruqt-go, an open source Go client library for interacting with the Instruqt platform. It provides a simple and convenient way to programmatically access Instruqt's APIs, manage content, retrieve user data and track information. In this blog post, Raphaël shares how to automatically issue badges for Instruqt labs. Many thanks to Raphaël and the Isovalent team for creating valuable resources for Instruqt lab creators and educating users on Cilium!

In the first blog post, we talked about making labs fun and enjoyable by adding elements of gamification. Issuing badges is a fantastic way to motivate learners, giving them a sense of accomplishment for the skills they've gained, and Isovalent issues hundreds of them every month for the Cilium labs!

Issuing Credentials

Obviously, issuing badges can be done manually, but this is not scalable or ideal for creating a seamless experience. So, let's automate it!

Credly is a widely recognized provider of digital badges, so we will be using this solution to issue badges whenever a user finishes an Instruqt lab.
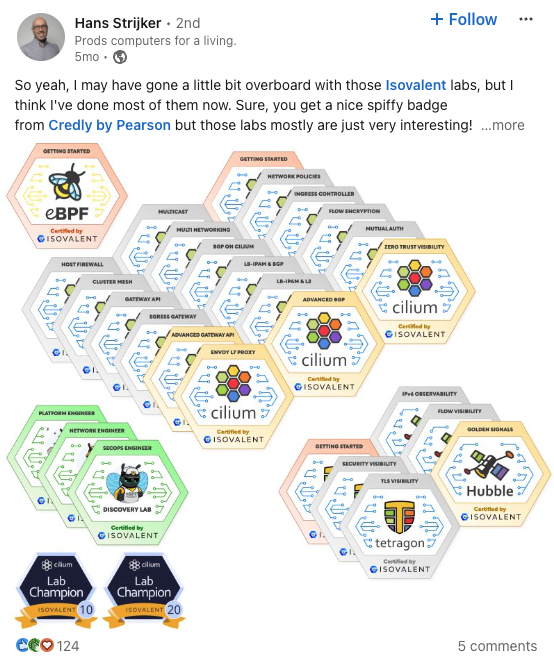
Who doesn't love earning badges‽

We'll be using Instruqt webhooks, coupled with the Credly API, to automatically issue badges when labs are completed. And thanks to Isovalent's open-sourced Go libraries for both Instruqt and Credly APIs, we'll find this automation process smooth and straightforward.

Overview

In this post, we'll take you step by step through the process:

  1. Setting up the environment and harnessing Google Cloud Functions.
  2. Initializing imports, constants, and setting up secret environment variables.
  3. Implementing the webhook and explaining each step.
  4. Setting up the webhook in Instruqt and adding signature verification to secure it.
  5. Testing locally using Docker and Docker Compose.
  6. Deploying the webhook and required secrets to Google Cloud Platform.
  7. Wrapping up with some final considerations.

Let's dive in!

Pre-Requisites

As for the first blog post, you will need an Instruqt account (with an API key) and a Google Cloud project.

In addition, you will also need a Credly account with an API key this time.

Setting Up the Environment

First, create a directory for your function and initialize the Go environment.

mkdir instruqt-webhook
cd instruqt-webhook

go mod init example.com/labs

Just as in the first post, we create a cmd directory so we can build and test the function locally:

mkdir cmd

Create a main.go file in that directory, with the following content:

package main

import (
    "log"
    "os"

    // Blank-import the function package so the init() runs
    // Adapt if you replaced example.com earlier
    _ "example.com/labs"

    "github.com/GoogleCloudPlatform/functions-framework-go/funcframework"
)

func main() {
    // Use PORT environment variable, or default to 8080.
    port := "8080"
    if envPort := os.Getenv("PORT"); envPort != "" {
        port = envPort
    }
    if err := funcframework.Start(port); err != nil {
        log.Fatalf("funcframework.Start: %v\n", err)
    }
}

Back to the instruqt-webhook directory, create a file named webhook.go to contain the function logic. This file will serve as the webhook handler for incoming events from Instruqt.

Setting Up the Basics

In webhook.go, begin by adding the necessary imports, constants, and initializing the function:

package labs

import (
	"fmt"
	"net/http"
	"os"
	"strings"

	"github.com/GoogleCloudPlatform/functions-framework-go/functions"

	"github.com/isovalent/instruqt-go/instruqt"
	"github.com/isovalent/credly-go/credly"

)

func init() {
	functions.HTTP("InstruqtWebhookCatch", instruqtWebhookCatch)
}

const (
    instruqtTeam = "yourInstruqtTeam"   // Replace with your own team name
    credlyOrg    = "yourCredlyOrg"      // Replace with your own credly organization ID
)

Implementing the Webhook Receiver

Now, let's write the instruqtWebhookCatch function to receive the event.

We will take advantage of the methods provided by the Isovalent instruqt-go library to manage the Instruqt webhook:

func instruqtWebhookCatch(w http.ResponseWriter, r *http.Request) {
	webhookSecret := os.Getenv("INSTRUQT_WEBHOOK_SECRET")
 	wbHandler := instruqt.HandleWebhook(processWebhook, webhookSecret)
	wbHandler(w, r)
}

This function works as a proxy between the HTTP connection handler provided by the Google Cloud Functions framework and the instruqt.HandleWebhook method provided by Isovalent's library to manage the Svix webhook.

It allows us to set up a webhook manager by passing the webhook's secret. We will see later where to find the value for the webhook secret.

The instruqt.HandleWebhook method will automatically:

  1. Verify the webhook signature using svix.
  2. Parse the incoming event payload.
  3. Check if the event is valid.
  4. Retrieve the information into an instruqt.WebhookEvent structure.

Step 4: The process Webhook() Function

Next, we need to implement the processWebhook function, where our logic will be placed.

This function will receive 3 parameters:

  • the HTTP connection handlers (http.ResponseWriter and *http.Request) inherited from the GCP Function handler;
  • the instruqt.Webhook structure parsed by instruqt.HandleWebhook and passed down to us.

Here's the complete implementation:

func processWebhook(w http.ResponseWriter, r *http.Request, webhook instruqt.WebhookEvent) (err error) {
	// Return early if the event type is not track.completed
	if webhook.Type != "track.completed" {
		w.WriteHeader(http.StatusNoContent)
		return
	}

	// Setup the Instruqt client
	instruqtToken := os.Getenv("INSTRUQT_TOKEN")
	if instruqtToken == "" {
		w.WriteHeader(http.StatusInternalServerError)
		return
	}
	instruqtClient := instruqt.NewClient(instruqtToken, instruqtTeam)

	// Setup the Credly client
	credlyToken := os.Getenv("CREDLY_TOKEN")
	if credlyToken == "" {
		w.WriteHeader(http.StatusInternalServerError)
		return
	}
	credlyClient := credly.NewClient(credlyToken, credlyOrg)

	// Get user info from Instruqt
	user, err := instruqtClient.GetUserInfo(webhook.UserId)
	if err != nil {
		fmt.Printf("Failed to get user info: %v", err)
		w.WriteHeader(http.StatusInternalServerError)
		return
	}

	// Get track details to extract badge template ID from tags
	track, err := instruqtClient.GetTrackById(webhook.TrackId)
	if err != nil {
		fmt.Printf("Failed to get track info: %v", err)
		w.WriteHeader(http.StatusInternalServerError)
		return
	}

	// Extract badge template ID from track tags
	var templateId string
	for _, tag := range track.TrackTags {
		// Use strings.Split to parse the tag and extract the badge template ID
		parts := strings.Split(tag.Value, ":")
		if len(parts) == 2 && parts[0] == "badge" {
			templateId = parts[1]
			break
		}
	}

	if templateId == "" {
		fmt.Printf("No badge template ID found for track %s", webhook.TrackId)
		w.WriteHeader(http.StatusBadRequest)
		return
	}

	// Issue badge through Credly
	_, badgeErr := credlyClient.IssueBadge(templateId, user.Email, user.FirstName, user.LastName)
	// Check if the badge has already been issued
	if badgeErr != nil {
		if strings.Contains(badgeErr.Error(), credly.ErrBadgeAlreadyIssued) {
			fmt.Printf("Badge already issued for %s", user.Email)
			w.WriteHeader(http.StatusConflict)
			return
		}
		fmt.Printf("Failed to issue badge: %v", badgeErr)
		w.WriteHeader(http.StatusInternalServerError)
		return
	}

	w.WriteHeader(http.StatusOK)
	return
}

This function does the following:

  1. Check if the event is of type track.completed, exit otherwise.
  2. Instantiate Instruqt and Credly clients using environment variables for the tokens.
  3. Retrieve user information from the Instruqt API. This requires to ensure that Instruqt has that information. See the first blog post to find how to do that with a proxy.
  4. Get track information from Instruqt. We will use set a badge:<badge_id> special tag on the track to store the Credly badge ID to issue.
  5. Parse track tags to find the badge template ID.
  6. Issue the badge using the Credly library.

Setting Up the Webhook on Instruqt

To enable Instruqt to call your webhook, navigate to the Instruqt UI, go to Settings -> Webhooks, and click "Add Endpoint" to set up a new webhook that points to your Google Cloud Function URL.
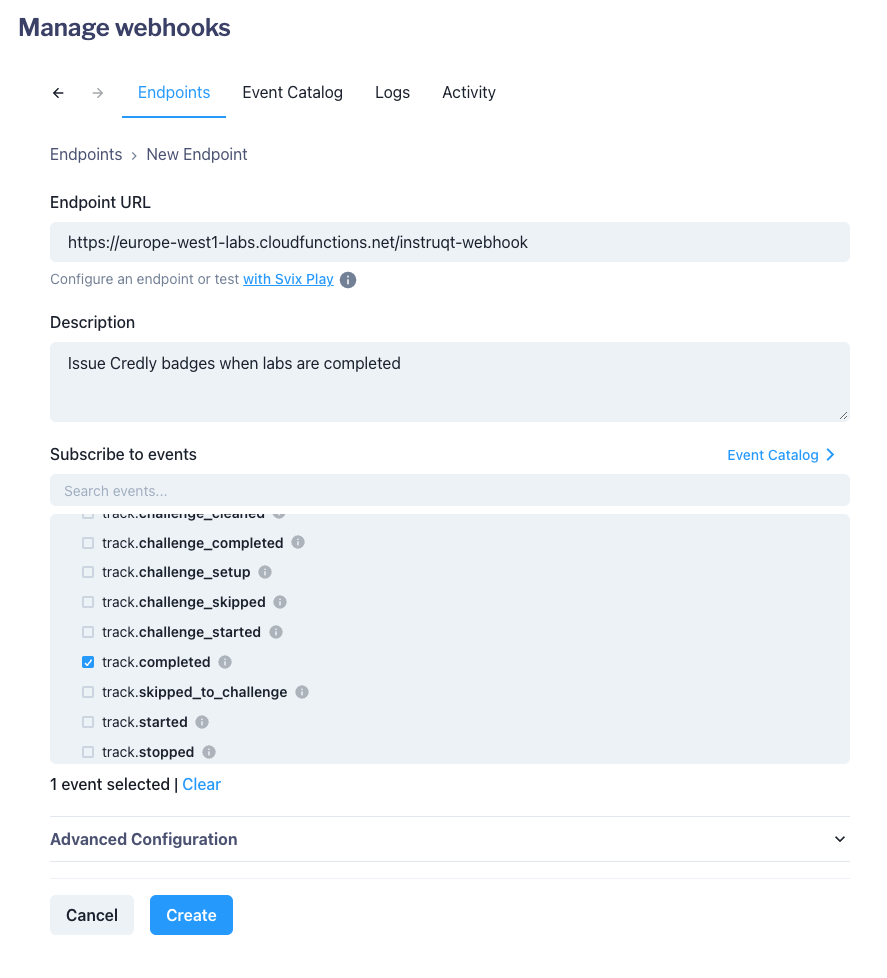
Create Webhook

Select track.completed in the list of events to fire up this endpoint.

Since we'll be hosting the function on Google Cloud Functions, the URL will be in the form https://<zone>-<project>.cloudfunctions.net/<name>. For example, if your function is called instruqt-webhook and is deployed in the labs GCP project in the europe-west1 zone, then the URL will be https://europe-west1-labs.cloudfunctions.net/instruqt-webhook. If in doubt, put a fake URL and you can modify it later.

Create "Create", then locate the "Signing secret" field to the right side of the panel and copy its value.

Export it in your terminal as the INSTRUQT_WEBHOOK_SECRET value:

export INSTRUQT_WEBHHOOK_SECRET=whsec_v/somevalueCopiedFromUi

Then use it to create a new GCP secret called instruqt-webhook-secret:

echo -n "$INSTRUQT_WEBHHOOK_SECRET" | gcloud secrets create instruqt-webhook-secret --data-file=-

Give it the proper permissions to be usable in your function (see first blog post for details):

PROJECT_NUMBER=$(gcloud projects describe $(gcloud config get-value project) --format="value(projectNumber)")
gcloud secrets add-iam-policy-binding instruqt-webhook-secret \
    --member="serviceAccount:${PROJECT_NUMBER}-compute@developer.gserviceaccount.com" \
    --role="roles/secretmanager.secretAccessor"

Also create a secret for your Credly token:

export CREDLY_TOKEN=yourCredlyToken
echo -n "$CREDLY_TOKEN" | gcloud secrets create credly-token --data-file=-
gcloud secrets add-iam-policy-binding credly-token \
    --member="serviceAccount:${PROJECT_NUMBER}-compute@developer.gserviceaccount.com" \
    --role="roles/secretmanager.secretAccessor"

Testing the Code

Let's check that this function builds and runs fine.

First, update your go.mod and go.sum files with:

go get ./...
go mod tidy

Now, run the function:

FUNCTION_TARGET=InstruqtWebhookCatch go run ./cmd/main.go

The function should compile and run fine. You can try sending queries to it on localhost:8080:

curl -i localhost:8080

Expect to get an error since the Svix webhook authentication is not set up properly in the payload:

HTTP/1.1 405 Method Not Allowed
Content-Type: text/plain; charset=utf-8
X-Content-Type-Options: nosniff
Date: Tue, 08 Oct 2024 13:20:47 GMT
Content-Length: 23

Invalid request method

It would be possible to emulate this, but it's a bit complex, so let's just deploy to GCP now!

Alternative Testing: Using Docker

If you'd like to use Docker to test your function locally, you can create a Dockerfile in your current directory:

FROM golang:1.23

WORKDIR /app

COPY . .

RUN go build -o myapp ./cmd/main.go

ENV DEV=true
ENV PORT=8080

EXPOSE $PORT

CMD ["./myapp"]

Add a docker-compose.yaml file:

version: '3'
services:
  proxy:
    build: ./
    ports:
      - "8080:8080"
    environment:
      INSTRUQT_WEBHOOK_SECRET: ${INSTRUQT_WEBHOOK_SECRET}
      INSTRUQT_TOKEN: ${INSTRUQT_TOKEN}
      CREDLY_TOKEN: ${CREDLY_TOKEN}
      FUNCTION_TARGET: InstruqtWebhookCatch

Finally, build and launch your container:

docker-compose up --build

And you can send requests to localhost:8080 just the same as before!

Deploy the Function

You can then deploy the function (adapt the region if needed), giving it access to all three secret values:

gcloud functions deploy "instruqt-webhook" \
  --gen2 --runtime=go122 --region=europe-west1 --source=. \
  --entry-point="InstruqtWebhookCatch" --trigger-http --allow-unauthenticated \
  --set-secrets="INSTRUQT_WEBHOOK_SECRET=instruqt-webhook-secret:latest" \
  --set-secrets="INSTRUQT_TOKEN=instruqt-token:latest" \
  --set-secrets="CREDLY_TOKEN=credly-token:latest"

This will upload and build your project, and return the URL to access the function.

If necessary, update the URL in your Instruqt webhook configuration.

Testing

Now for the moment of truth: testing!

  1. Create a badge on Credly. Publish it and copy its template ID.
  2. Add a tag to the Instruqt track you want to associate the badge with. Name the tag badge:<template_ID>, replacing template_ID with the ID you just copied.
  3. Publish the track.
  4. Take the track and complete it!

You should get the badge in your email!

Further Considerations

  • User Information: Make sure you read the first blog post to understand how to send user information to Instruqt.
  • Make it worth it!: Getting badges is fun, but it's better if users deserve them. Consider adding exam steps to your tracks to make earning the badges a challenge.
  • Rate Limiting and Retries: Consider rate limiting incoming webhook requests to prevent abuse and adding retry logic to handle temporary failures when interacting with Credly.
  • Manage more Events: This webhook manager only manages track.completed events. You can extend it to do a lot more things with all the events provided by Instruqt! I typically like to capture lots of events to send them to Slack for better visibility.
  • Logs: Consider adding more logging (for example using the GCP logging library) to the code.

Explore the instruqt-go library

Head over to Isovalent’s GitHub to access the instruqt-go library, which provides a simple and convenient way to programmatically access Instruqt's APIs, manage content, retrieve user data and track information.

Again, thank you to Raphaël and the Isovalent team for making these resources publicly available!

Sign up for newsletter

Here you'll get a quarterly newsletter made for growth-minded people

Thank you! Your submission has been received!
Oops! Something went wrong while submitting the form.
Sign up for newsletter

Here you'll get a quarterly newsletter made for growth-minded people

Thank you! Your submission has been received!
Oops! Something went wrong while submitting the form.

Try Instruqt Yourself

Get a closer look at how Instruqt can help you sell smarter and train better.

Take a self-guided tour of Instruqt