How to Run a Selenium UI Test Against a Chrome Browser With Instruqt

Running UI tests on web servers running with an Instruqt virtual machine (VM) is a challenge. The preset Debian and Ubuntu VM images are headless servers. As a result, executing UI tests from the command line of an Instruqt track is difficult because the track’s VM does not have the graphic libraries that a browser needs to run. Were you to run the following command in a Linux terminal …
google-chrome www.example.com
… which is the command to bring up the website www.example.com in a Chrome web page, you might get an error such as the following:

The reason for the error is that the server doesn’t have the graphical capabilities the browser requires. This becomes particularly troublesome if you want to demonstrate Selenium testing against a website that’s running on localhost. When the graphic libraries are absent, you can’t write Selenium tests that fill in textboxes and click buttons on a web page because there is no running browser that renders those textboxes and buttons you want to use in your tests.
Thus, if you want to run UI testing under Instruqt, you’re going to need to do some special setup work configuring the Instruqt track to get it all to happen
This article describes how to do the type of special setup needed.
In this article, you’ll learn how to make an Instruct track run Chrome in headless mode. (Headless mode is when the browser is running in memory virtually, not rendering graphics on a monitor.) Then, once Chrome is running headlessly, I’ll show you how to execute a Selenium UI test against a web page running in the Chrome headless browser under an Instruqt challenge.
In order to get the full benefit from reading this article, I assume that you are familiar with creating Instruqt tracks. I assume you know the purpose of a track’s config.yaml file. Also, I assume that you know how to create a setup script for a track and that you know how to configure an Instruqt challenge so that it displays two terminal windows.
Installing the Ubuntu Desktop for Your Instruqt VM
The first thing you need to do to get Chrome to run within an Instruqt VM is to use a Ubuntu Desktop image for the VM’s operating system. The way you do this is to declare in the config.yaml of your Instruqt track the image ubuntu-pro-2204-lts that’s hosted on Google Cloud. The image ubuntu-pro-2204-lts is the latest version of Ubuntu Desktop. Listing 1 below shows an example of a config.yaml file that declares the image. Notice the declaration is set for the image attribute.
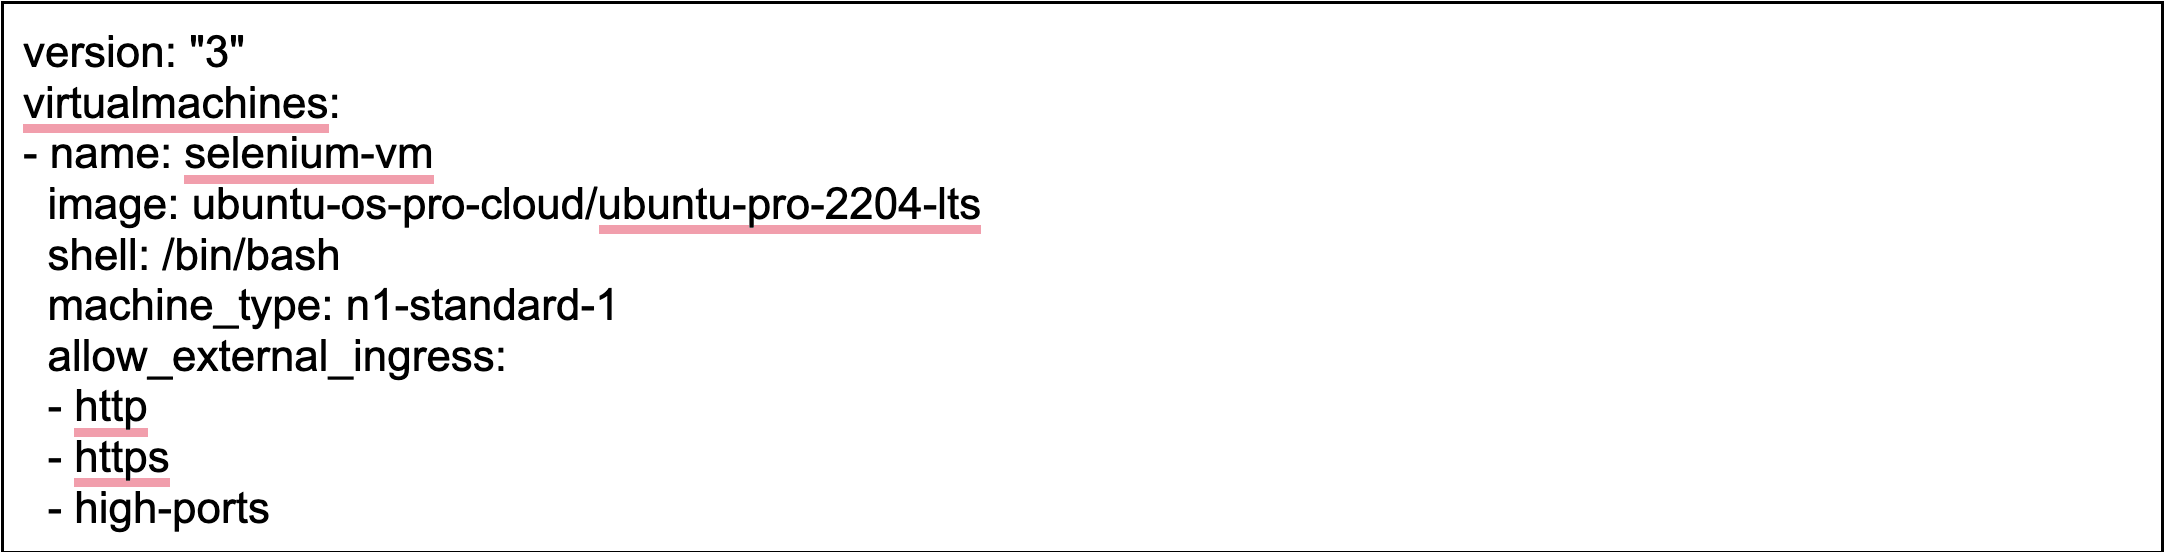
The Ubuntu Desktop operating system provides all the graphics libraries you need to run Google Chrome. Putting the declaration for the Ubuntu Desktop image in the config.yaml file makes it so that the image will be used when the Instruqt track first starts up.
Next, you’ll need to configure the Instruqt track to install Google Chrome into the VM.
Installing Chrome to Run Headless
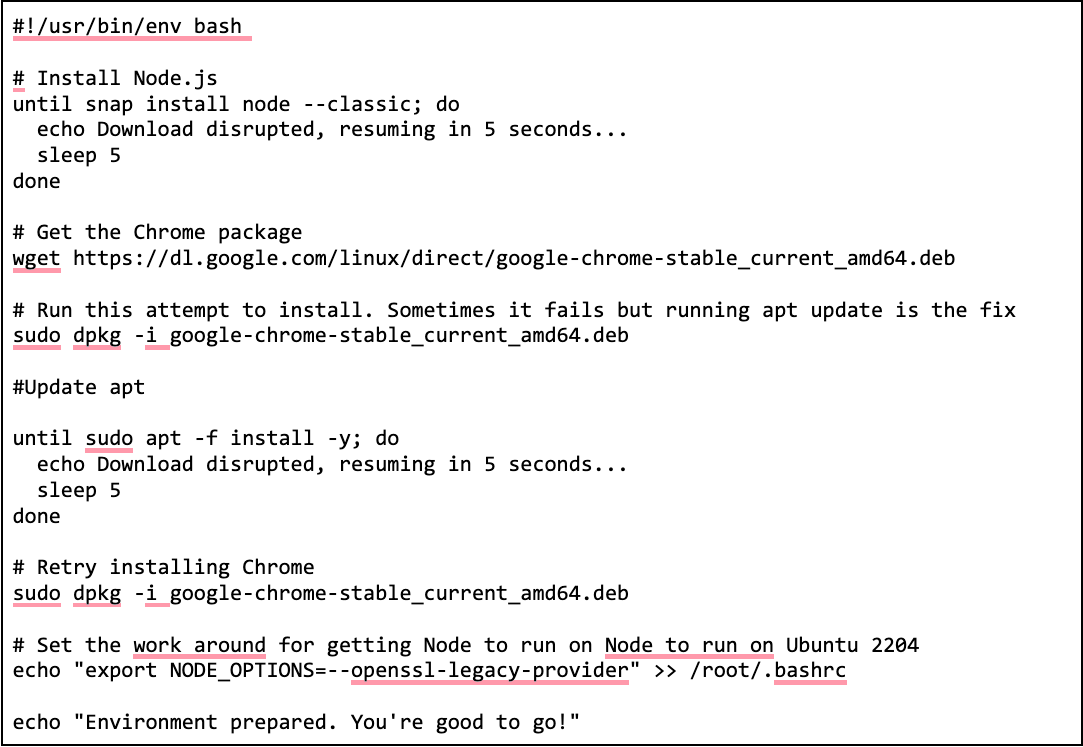
You’ll install the Chrome browser in the Instruqt VM by adding the installation code to the track setup file. The track setup file has the code that will be run right after the track’s virtual machine is set up. Listing 2 shows an example setup file that configures an Instruqt track with the Chrome browser as well as Node.JS
Once the setup file is run, you're ready to execute a Selenium test from the command line. In this case, you’ll test a Web Page using Selenium from within a unit test under Node.js.
Understanding the Demonstration Project
The code that contains the Selenium unit test is in the demonstration project for this article hosted on GitHub. The demonstration project is a web server that publishes a web page into which a user types a name and clicks a button. Then the web page displays a secret message. Figure 1 below shows the web page rendered in a Chrome browser.
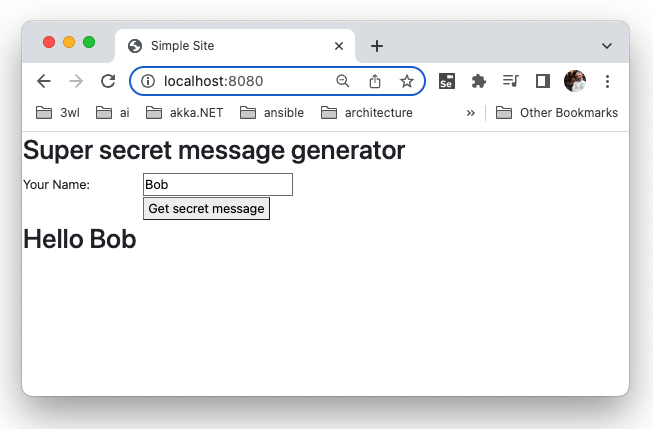
The Selenium test you’ll run will enter the text Bob in the text box, click the button labeled “Get secret message” and then check the results of the output. An important thing to remember is that the Selenium test is executed in a virtual version of Chrome. There is no monitor involved, only a virtual version of the browser running in memory.
Running the Demonstration Code in an Instruqt Challenge
Once you have done all the configuration of the Instruqt VM, create an Instruqt challenge that has two terminal windows. Go to the first terminal window and clone the demonstration project using the following command.
git clone https://github.com/reselbob/simple-site
Then navigate to the source code’s working directly and install the project's dependencies using the following command:
cd simple-site && npm install
Once the dependencies are installed start-up the demonstration projects web server by executing the following command in the first terminal window;
npm start
You’ll see output similar to the following:
2023-03-07T00:49:19.640Z info: Node server is running on port 8080 at Mon Mar 06 2023 16:49:19 GMT-0800
The web server is up and running. Now you’re ready to execute the UI test.
Go to the second terminal window. Navigate to the source code working directory and run the UI test by executing the following command.
cd simple-site && npm test
You’ll see output similar to the following when the test runs successfully.
Executing the Selenium UI Test
The code for the UI test that’s run for Selenium is shown below in Listing 3.
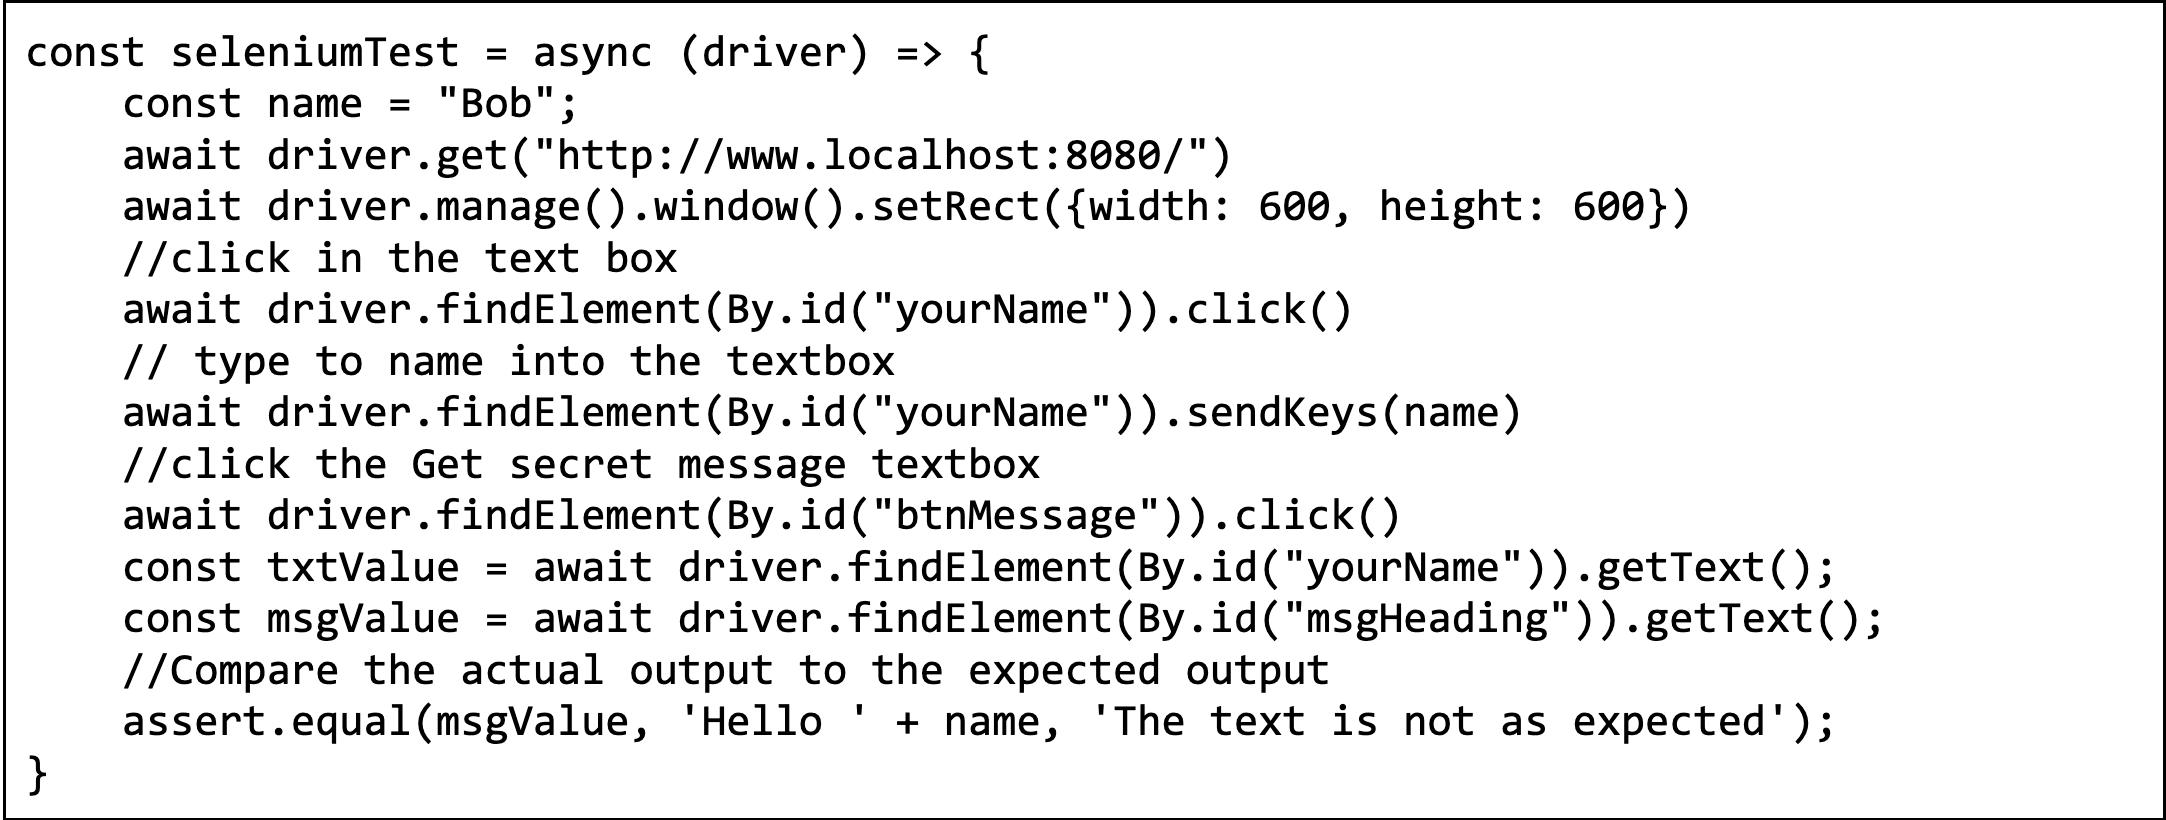
The UI test is run as a Node.JS unit test run under the Mocha test framework. You can view the entire file for the UI test on GitHub here.
A critical part of getting the UI test to run against a headless Chrome browser is properly configuring the options for the Selenium webdriver that runs the UI test. The webdriver is the library that does the work of interacting with the web page under test in the Chrome browser.
Listing 4 below shows the code in the unit test file that configures the options for the Selenium webdriver.
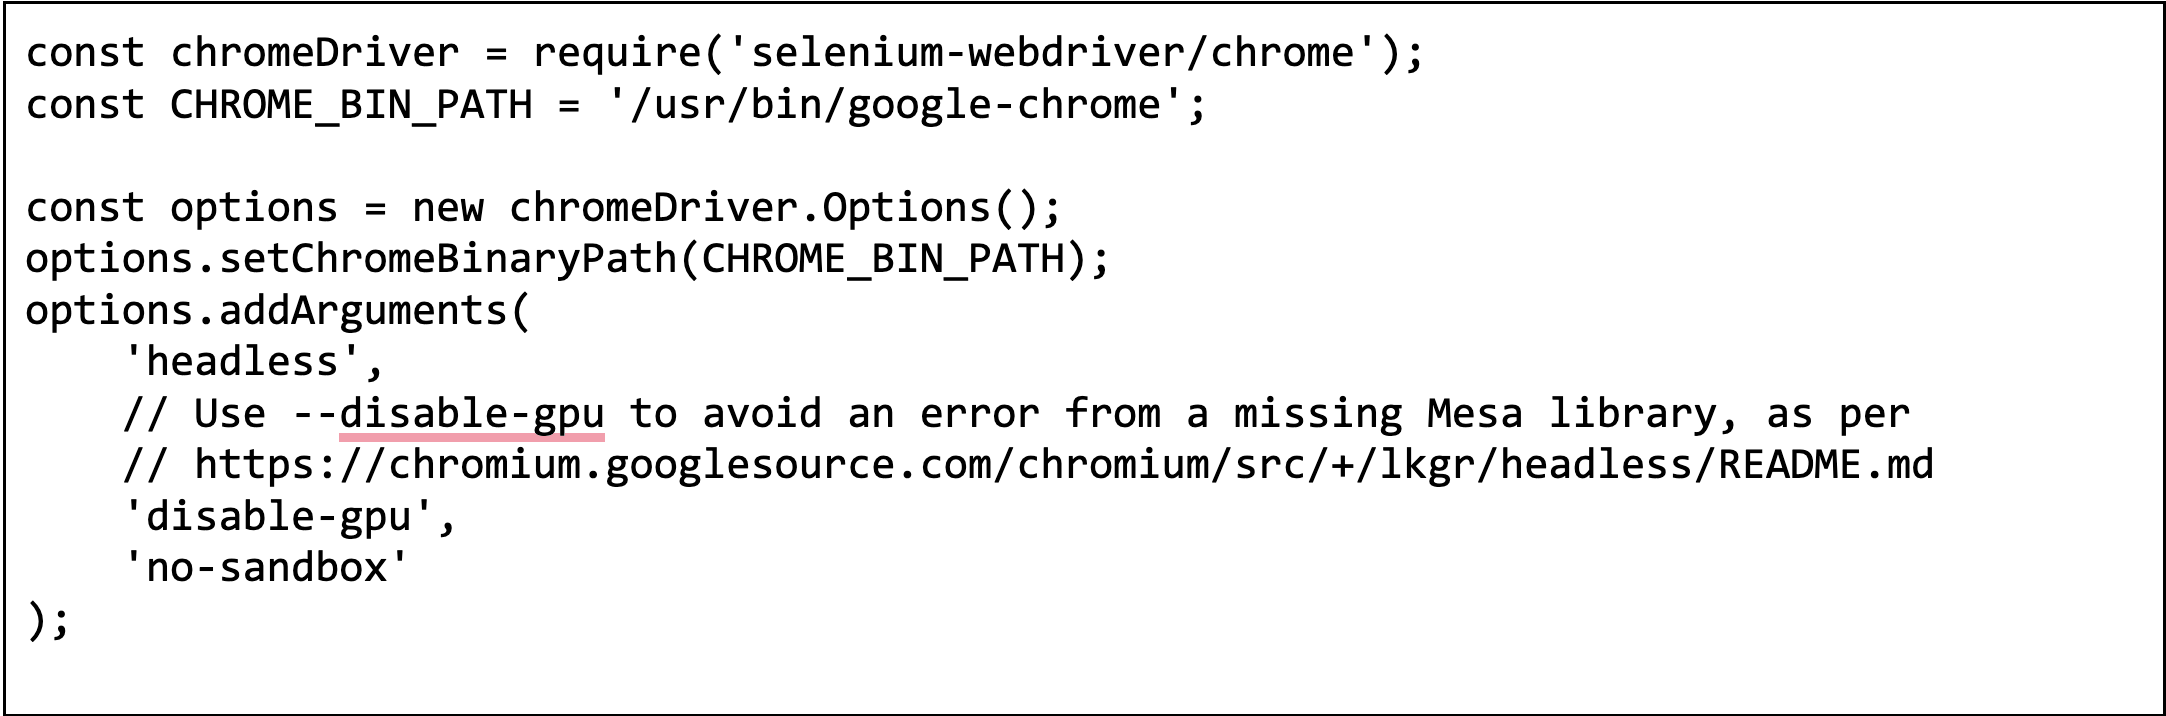
In order for the UI test to run the Selenium driver properly it needs to know the location of the Chrome executable that’s running in the Instruqt VM. In Listing 5 shown above, this information is configured by defining a variable CHROME_BIN_PATH and assigning the value that’s the path to the Chrome executable on the Instruqt VM. The variable is assigned to the webdriver options using the options.SetChromeBinaryPath() method to set the value.
The other required options – headless, disable-gpu and no-sandbox – are configured using the options.addArguments() method. Once these are all set, the Selenium webdriver is operational for use against the headless Chrome browser.
Getting Hands-on Experience in an Actual Instruqt Track
Admittedly this description for setting up the UI test is brief. To get a full understanding of what’s involved it’s useful to take a look at the source code of the demonstration project in GitHub. You can view the code for the UI test here.
Also, I’ve created a hands-on, interactive track on Instruqt that covers all the information I’ve presented in this article. You can find the track here.
Putting it All Together
Unit testing is an essential part of the software development lifecycle. While each type of unit test presents a special set of issues to overcome, automated UI testing at scale is particularly challenging because these tests typically run on machines that are headless. There is no monitor attached. Hence, the browser needs to be virtualized. This is as true for running UI tests under an Instruqt track as it is for running UI tests on a rack of servers running in a data center. The information presented in this article shows you how to virtualize the browser.
Instruqt is a great educational platform. As the saying goes, you can learn a lot by doing. Hopefully, the information and techniques I’ve shared with you in this article will make it easier for you to get to the next level of Instruqt development by enabling you to conduct comprehensive UI testing on web applications running on the platform.
Running UI tests on web servers running with an Instruqt virtual machine (VM) is a challenge. The preset Debian and Ubuntu VM images are headless servers. As a result, executing UI tests from the command line of an Instruqt track is difficult because the track’s VM does not have the graphic libraries that a browser needs to run. Were you to run the following command in a Linux terminal …
google-chrome www.example.com
… which is the command to bring up the website www.example.com in a Chrome web page, you might get an error such as the following:
The reason for the error is that the server doesn’t have the graphical capabilities the browser requires. This becomes particularly troublesome if you want to demonstrate Selenium testing against a website that’s running on localhost. When the graphic libraries are absent, you can’t write Selenium tests that fill in textboxes and click buttons on a web page because there is no running browser that renders those textboxes and buttons you want to use in your tests.
Thus, if you want to run UI testing under Instruqt, you’re going to need to do some special setup work configuring the Instruqt track to get it all to happen
This article describes how to do the type of special setup needed.
In this article, you’ll learn how to make an Instruct track run Chrome in headless mode. (Headless mode is when the browser is running in memory virtually, not rendering graphics on a monitor.) Then, once Chrome is running headlessly, I’ll show you how to execute a Selenium UI test against a web page running in the Chrome headless browser under an Instruqt challenge.
In order to get the full benefit from reading this article, I assume that you are familiar with creating Instruqt tracks. I assume you know the purpose of a track’s config.yaml file. Also, I assume that you know how to create a setup script for a track and that you know how to configure an Instruqt challenge so that it displays two terminal windows.
Installing the Ubuntu Desktop for Your Instruqt VM
The first thing you need to do to get Chrome to run within an Instruqt VM is to use a Ubuntu Desktop image for the VM’s operating system. The way you do this is to declare in the config.yaml of your Instruqt track the image ubuntu-pro-2204-lts that’s hosted on Google Cloud. The image ubuntu-pro-2204-lts is the latest version of Ubuntu Desktop. Listing 1 below shows an example of a config.yaml file that declares the image. Notice the declaration is set for the image attribute.
The Ubuntu Desktop operating system provides all the graphics libraries you need to run Google Chrome. Putting the declaration for the Ubuntu Desktop image in the config.yaml file makes it so that the image will be used when the Instruqt track first starts up.
Next, you’ll need to configure the Instruqt track to install Google Chrome into the VM.
Installing Chrome to Run Headless
You’ll install the Chrome browser in the Instruqt VM by adding the installation code to the track setup file. The track setup file has the code that will be run right after the track’s virtual machine is set up. Listing 2 shows an example setup file that configures an Instruqt track with the Chrome browser as well as Node.JS
Once the setup file is run, you're ready to execute a Selenium test from the command line. In this case, you’ll test a Web Page using Selenium from within a unit test under Node.js.
Understanding the Demonstration Project
The code that contains the Selenium unit test is in the demonstration project for this article hosted on GitHub. The demonstration project is a web server that publishes a web page into which a user types a name and clicks a button. Then the web page displays a secret message. Figure 1 below shows the web page rendered in a Chrome browser.
The Selenium test you’ll run will enter the text Bob in the text box, click the button labeled “Get secret message” and then check the results of the output. An important thing to remember is that the Selenium test is executed in a virtual version of Chrome. There is no monitor involved, only a virtual version of the browser running in memory.
Running the Demonstration Code in an Instruqt Challenge
Once you have done all the configuration of the Instruqt VM, create an Instruqt challenge that has two terminal windows. Go to the first terminal window and clone the demonstration project using the following command.
git clone https://github.com/reselbob/simple-site
Then navigate to the source code’s working directly and install the project's dependencies using the following command:
cd simple-site && npm install
Once the dependencies are installed start-up the demonstration projects web server by executing the following command in the first terminal window;
npm start
You’ll see output similar to the following:
2023-03-07T00:49:19.640Z info: Node server is running on port 8080 at Mon Mar 06 2023 16:49:19 GMT-0800
The web server is up and running. Now you’re ready to execute the UI test.
Go to the second terminal window. Navigate to the source code working directory and run the UI test by executing the following command.
cd simple-site && npm test
You’ll see output similar to the following when the test runs successfully.
Executing the Selenium UI Test
The code for the UI test that’s run for Selenium is shown below in Listing 3.
The UI test is run as a Node.JS unit test run under the Mocha test framework. You can view the entire file for the UI test on GitHub here.
A critical part of getting the UI test to run against a headless Chrome browser is properly configuring the options for the Selenium webdriver that runs the UI test. The webdriver is the library that does the work of interacting with the web page under test in the Chrome browser.
Listing 4 below shows the code in the unit test file that configures the options for the Selenium webdriver.
In order for the UI test to run the Selenium driver properly it needs to know the location of the Chrome executable that’s running in the Instruqt VM. In Listing 5 shown above, this information is configured by defining a variable CHROME_BIN_PATH and assigning the value that’s the path to the Chrome executable on the Instruqt VM. The variable is assigned to the webdriver options using the options.SetChromeBinaryPath() method to set the value.
The other required options – headless, disable-gpu and no-sandbox – are configured using the options.addArguments() method. Once these are all set, the Selenium webdriver is operational for use against the headless Chrome browser.
Getting Hands-on Experience in an Actual Instruqt Track
Admittedly this description for setting up the UI test is brief. To get a full understanding of what’s involved it’s useful to take a look at the source code of the demonstration project in GitHub. You can view the code for the UI test here.
Also, I’ve created a hands-on, interactive track on Instruqt that covers all the information I’ve presented in this article. You can find the track here.
Putting it All Together
Unit testing is an essential part of the software development lifecycle. While each type of unit test presents a special set of issues to overcome, automated UI testing at scale is particularly challenging because these tests typically run on machines that are headless. There is no monitor attached. Hence, the browser needs to be virtualized. This is as true for running UI tests under an Instruqt track as it is for running UI tests on a rack of servers running in a data center. The information presented in this article shows you how to virtualize the browser.
Instruqt is a great educational platform. As the saying goes, you can learn a lot by doing. Hopefully, the information and techniques I’ve shared with you in this article will make it easier for you to get to the next level of Instruqt development by enabling you to conduct comprehensive UI testing on web applications running on the platform.


You might also like


Try Instruqt Yourself
Get a closer look at how Instruqt can help you sell smarter and train better.
Take a self-guided tour of Instruqt